The Oven, Part II . . .
Alrighty then. I didn't manage to get to church yesterday due to one thing or another, so I got started on the oven earlier than anticipated.
You'll remember the Quick Reminders on how to clean my self-cleaning oven:
1. Prepare the oven for cleaning. Check! I bid adeiu to the carbonized sweet potato goo and wiped down the interior of the oven. It doesn't really look so bad now, does it?
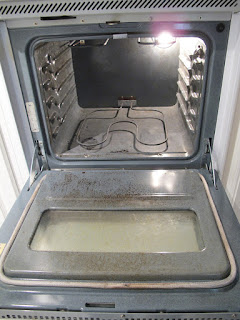
Next, I got all the glop out from under the door (ick!) and I used my SOS pad on the frame, according to the directions in the manual. Wow - it worked really well!!
 That's the part that was all brown in yesterday's photo.
I wiped the spots where I used the SOS down with water and vinegar - again, according to the directions, and then I put the two racks in the sink. Here they are - the front one is clean, the one in back is not.

The manual says, "The oven shelves [racks] may be cleaned in the self-cleaning oven. However, they will darken, lose their luster and become hard to slide. It became clear pretty quickly that the original owner had left them in the oven at some point when she cleaned it, because their shiny finish was gone. Here they are both clean and waiting to return to their rightful spots.

(I was going try what the manual says: "Wipe the shelf supports with cooling oil after self-cleaning to make the selves slide more easily." because they never did slide in and out very well, but now that I scrubbed them they are better.)
2. Close the oven door. Check! That was painless.
3. Press the CLEAN pad. Ahem . . . Check! :-D
4. Press the INCREASE or DECREASE pad to set the Clean Time.

I chose the four-hour option. I think that an oven that hasn't been cleaned for 12 years constitutes "very dirty." It did occur to me that the self-cleaning feature might not work - these are ovens from 1985, after all . . . but after I pressed the CLEAN pad and set the cleaning time, I heard what sounded like a little gear turning - which I'm sure was that latch hook latching itself to keep the oven door tightly closed during the cleaning process.
And now, we wait . . .
2 Hours Later . . .
OK this was kind of scary
 4 Hours Later . . .
 It's all clean, but still needs to be wiped out. The white spots on the side were there when we started, I think I might have to use a little bit of SOS on them to get the white spots off and rinse with vinegar and water. But not now.
I did break out the SOS again to clean the inside of the window on the door. That worked really well, and then I did a quick wipedown - which did take care of some of the white spots. So - here's where we started:

And here's how we finished:

Wahoo!!!!
You'll remember the Quick Reminders on how to clean my self-cleaning oven:
1. Prepare the oven for cleaning. Check! I bid adeiu to the carbonized sweet potato goo and wiped down the interior of the oven. It doesn't really look so bad now, does it?

Next, I got all the glop out from under the door (ick!) and I used my SOS pad on the frame, according to the directions in the manual. Wow - it worked really well!!

I wiped the spots where I used the SOS down with water and vinegar - again, according to the directions, and then I put the two racks in the sink. Here they are - the front one is clean, the one in back is not.

The manual says, "The oven shelves [racks] may be cleaned in the self-cleaning oven. However, they will darken, lose their luster and become hard to slide. It became clear pretty quickly that the original owner had left them in the oven at some point when she cleaned it, because their shiny finish was gone. Here they are both clean and waiting to return to their rightful spots.

(I was going try what the manual says: "Wipe the shelf supports with cooling oil after self-cleaning to make the selves slide more easily." because they never did slide in and out very well, but now that I scrubbed them they are better.)
2. Close the oven door. Check! That was painless.
3. Press the CLEAN pad. Ahem . . . Check! :-D
4. Press the INCREASE or DECREASE pad to set the Clean Time.

I chose the four-hour option. I think that an oven that hasn't been cleaned for 12 years constitutes "very dirty." It did occur to me that the self-cleaning feature might not work - these are ovens from 1985, after all . . . but after I pressed the CLEAN pad and set the cleaning time, I heard what sounded like a little gear turning - which I'm sure was that latch hook latching itself to keep the oven door tightly closed during the cleaning process.
And now, we wait . . .
2 Hours Later . . .
OK this was kind of scary


I did break out the SOS again to clean the inside of the window on the door. That worked really well, and then I did a quick wipedown - which did take care of some of the white spots. So - here's where we started:

And here's how we finished:

Wahoo!!!!
Comments
Janice H.